
Monday, January 7, 2013
Will Be Selling Online Again Soon
I will be selling my jewelry again (and some new fashion items) online sometime in February 2013. My vision was comprimised by a large cataract in my right eye, making doing close work impossible. Hope to start posting new designs soon.

Thursday, November 24, 2011
Susie is no longer with us...
Many of you who have purchased my jewelry or have followed this blog have asked about Susie, my design coordinator in training. On November 18th, I had to take Susie to the vet to be put to sleep. She almost made it to her 14th birthday. She lived 18 months longer than she would have if I had not rescued her from my ex-husband. Her last days were happy and comfortable. She had been suffering with cancer for several weeks and had become too weak to stand on her own. The night of her death, her cries became so unbearable that I took her to the vet's emergency center to take her out of her misery. She went peacefully and is now buried with two of our other dogs on our land. Here are some last photos.


Susie and Lil Man on the sofa, 11/16/11.

Susie's grave.

Her headstone.
SHE WILL BE MISSED...
Saturday, November 20, 2010
HOW TO MAKE A DOUBLE SPIRAL BRACELET
I get so many people asking me how to do a double spiral bracelet. The trick is keeping the color segments separated while beading so you will get the look of two spirals. Most of this instruction is from Mastering Beadwork by Carol Huber Cypher and is the easiest to follow. I have added some tricks to get the pattern right and to get the most durable bracelet. Use complementary colors in your beads to get the most striking bracelet!
Materials:
70 to 90 of two different color 4mm beads (A, B)
110 to 130 size 6° or “E” seed beads (C)
At least 300 of two different color size 11° (10° fits better) seed beads (a,b)
Spool of Fireline beading thread (size 1)
.015 Beadalon coated beading wire
Beading needle
Closure, crimps, wire guardians
1. Place one full unit of base with both segments. Pick up 4C (base beads). Pick up 2a, 1A, 2a (Color Segment A). Pass needle through the bottom of 4C base (see figure 1). Push Segment A to the left. Pick up 2b, 1B, 2b (Color Segment B). Pass needle through bottom of 4C base (see figure 2). Thread Beadlon wire through C base beads.
Note: Rotate your work so that Segment A is on the right and Segment B is on the left.
2. Pick up 1C base bead and a Segment A (2a, 1A, 2a). Push them to the left side of the work. Pass needle through the top 3C of the base and new C bead (see figure 3). Thread Beadalon wire through new C base beads.

Note: Because the initial base was 4 beads, pass through 4 base beads with every segment.
3. Keeping Segment B on the right of the base and Segment A on the left, pick up a Segment B (2b, 1B, 2b) without the additional C bead. This keeps the segments on the same level. Pass needle through top 4C base beads.
4. Repeat steps 2 and 3 until the piece reaches the desired length. Keep passing the end of the Beadlon wire through each new C base bead added. Threading it through the work at the end is practically impossible.
Note: Use Beadlon wire, crimps and wire guardians to add clasp to your piece.
As more segments are added, it will get more difficult to find the proper place to thread through the base beads. Watch the staggered appearance of the 4 mm beads. They should look “stair-stepped” if you are threading in the right place. Also, you should starting a new segment right on top of an opposite color segment as you complete your way around the spiral (see figure 4).

Here’s a finished bracelet I just completed using round 4 mm Swarovski crystals in Light Siam and Lime. It is for sale at my Etsy store, Rojagato Designs:

Have fun beading!
Thursday, July 15, 2010
Sample of Sold Jewelry
Here's a few of my more recently sold jewelry pieces. Sold Jewelry I do custom pieces and each jewelry piece is one of a kind. Check out my EBay Store, Rojagato Designs for new jewelry that is currently for sale!
Claudia
Claudia
Tuesday, February 17, 2009
Beading With The Daisy Chain
 I've been kind of lax in my promise to post beading techniques and tips. School and my new part-time job are taking up a lot of my time, so I stayed up late tonight to write this blog post.
This stitch is a favorite of mine since you can use it as a base to build all sorts of jewelry on...plus it is a very easy technique to master. You can vary bead sizes, using a larger bead for the center of the daisy, or you can use all the same color and size to start a base for a necklace or choker.

Step One: 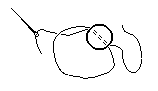
Pick up a "petal" bead on the needle. Pull the bead down the thread, leaving six to eight inches of thread as a tail. Pass the needle up through the bottom of the bead. (Try not to split the thread as it will be removed later. )

Pick up a "petal" bead on the needle. Pull the bead down the thread, leaving six to eight inches of thread as a tail. Pass the needle up through the bottom of the bead. (Try not to split the thread as it will be removed later. )

Step Two:
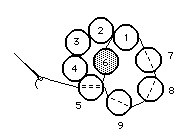
Pick up four more "petal" beads, then one "center" bead on the needle. Pass the needle back through bead #1 towards the tail.

Step Three:
Pick up three more "petal" beads (#7, #8 and #9) then pass the needle through bead #5.
Pick up three more "petal" beads (#7, #8 and #9) then pass the needle through bead #5.

Step Four:
Pick up one "petal" bead (#10) then pass the needle back through bead #9.

Step Five:
Pick up another "petal" bead (#11) then pass the needle back through bead #10.
Pick up another "petal" bead (#11) then pass the needle back through bead #10.

Step Six:
Pick up three more "petal" beads (#12, #13 and #14) and one "center" bead (#15). Pass the needle back through bead #11.

Step Seven:
Pick up three more "petal" beads (#16, #17 and #18) then pass the needle through bead #14.
Last Step:
Add more flowers until your chain reaches the desired length by repeating steps four through seven. Each additional daisy consists of 8 "petal" beads and 1 "center" bead.
When done, work the thread tail emerging from bead #1 back into the piece using the zig-zag method.
Here's a wonderful picture of a finished choker necklace using the daisy chain stitch with an interesting variation of colors.

Try this stitch out. It's fun and hard to make mistakes on. One piece of advice, use different colors for the "center" and "petal" beads to keep track of your stitches before you try a variation like this necklace.
Enjoy!
Claudia
Friday, January 9, 2009
Tubular Peyote Bracelet
With my U of A classes starting on Jan. 14th, I have no time to promote my Etsy shop and finish my 2008 business taxes. Also, I am running short on time to write posts to my blog. In the last couple of jewelry making posts, I used pictures and step-by-step written instructions. Not everyone can follow these types of instruction, so I started searching for some really good video instructions. I came across this Auntie’s Beads Karla Kam instruction for a tubular peyote bracelet on You Tube. It looks pretty easy to follow and you can pause the video as you need to.


Here is the link: http://www.youtube.com/watch?v=PQqgSBxokbc
Let me know how you like video instruction vs. written instructions. Relax and enjoy making your jewelry pieces!
Claudia
Sunday, January 4, 2009
Wrapped Headpins And Eyepins
Creating the wrapped loops on headpins was one of the hardest things to for me to master in jewelry making. The headpins can be costly, so your best bet is to buy some cheap 21 or 22 gauge beading wire without coating to practice on. Once you master the technique, it will add a touch of elegance and professionalism to your jewelry piece, plus increasing the security of your beads in the design.
You can create one wire wrap or as many as you like, but keep the number consistent throughout the piece. I like to use three wraps and 20 or 21 gauge headpins or eyepins.

Figure 1: Leaving a 1 inch (2.5 cm) tail, place the tip of your chain nose pliers where the bead will be. Bend the tail to form a right angle. I like using 2 inch headpins since they give you working room with the wire, but precious metals can be costly, so use the shortest headpin you can work comfortably with.


Figure 3: Rotate the pliers so the empty jaw is above the partial loop and continue pulling the tail around the bottom jaw until it is perpendicular to the bead or the wire.

Figure 4: Pull a split ring, chain, closed jump ring, etc. from the tail into the loop.

Figure 5: To keep the loop round, grasp it with round nose pliers in your opposite hand just above the cross. Do not press pliers tightly on loop as it will dent the wire.

Figure 6: Grasp the tail with chain nose pliers and pull it around the wire until it meets the bead. Make the first wrap against the pliers and keep wraps close. Clip and press wire end flat with pliers.
You can create one wire wrap or as many as you like, but keep the number consistent throughout the piece. I like to use three wraps and 20 or 21 gauge headpins or eyepins.

Figure 1: Leaving a 1 inch (2.5 cm) tail, place the tip of your chain nose pliers where the bead will be. Bend the tail to form a right angle. I like using 2 inch headpins since they give you working room with the wire, but precious metals can be costly, so use the shortest headpin you can work comfortably with.

Figure 2: With round nose pliers, grasp the tail just past the bend and pull it over the jaw to point the other way.

Figure 3: Rotate the pliers so the empty jaw is above the partial loop and continue pulling the tail around the bottom jaw until it is perpendicular to the bead or the wire.

Figure 4: Pull a split ring, chain, closed jump ring, etc. from the tail into the loop.

Figure 5: To keep the loop round, grasp it with round nose pliers in your opposite hand just above the cross. Do not press pliers tightly on loop as it will dent the wire.
Figure 6: Grasp the tail with chain nose pliers and pull it around the wire until it meets the bead. Make the first wrap against the pliers and keep wraps close. Clip and press wire end flat with pliers.
A couple of extra tips:
1) If you order your supplies online, you will not save money by ordering 24 gauge pins. They work fine in delicate pieces where you are using nothing but wrapped loops and tiny beads, but are too thin to make secure eye loops. Also, 24 gauge headpins will pass through most beads.
1) If you order your supplies online, you will not save money by ordering 24 gauge pins. They work fine in delicate pieces where you are using nothing but wrapped loops and tiny beads, but are too thin to make secure eye loops. Also, 24 gauge headpins will pass through most beads.
2) If you choose to use plated headpins, buy them from a dealer like Fire Mountain Gems. The headpins and eyepins you purchase at local craft dealers like Michael’s or JoAnn’s are of a poor quality and you will waste a lot of pins. The plating is not secure and will flake off when pin is bent.
Enjoy! Claudia
Sunday, December 28, 2008
Tubular Herringbone
 At shows and online I have seen a lot of jewelry crafters who have incorporated twisted strands of seed beads with a strand of large beads for bracelets and necklaces. The biggest complaint that I have heard about the jewelry is that the customer could not keep the seed beads twisted in the same way the artist had displayed the piece. In an attempt to get the same look myself, without customers complaining, I came across pictures of seed bead tubes and learned the stitch needed to create that look. Now my customers ask, “How do you get your seed beads to stay twisted?” The answer is easy…a tubular herringbone stitch!
When it comes to learning beading stitches, I am dyslexic. I cannot follow patterns or written instructions to save my life. After going from book to magazine to book again, I finally came across an instruction in a 2006 edition of Bead and Button magazine that I could use to teach the stitch to others. In the 2008 Beader’s Handbook (from editors of Bead and Button magazine), I found an even simpler version written by Associate Editor Lynne Soto.
Here is an excerpt: “Tubular herringbone usually starts from a ladder of beads formed into a ring, though it can also begin with a simple ring of beads. In either case, begin with an even number of beads. Once you get started, you can choose to make the ribs straight (photo c) or twisted (photo d).
Straight tubular herringbone
(1) For a ladder start, stitch a ladder with an even number of beads, and form it into a ring. Your thread should exit the top of a bead.
(2) Pick up two beads, and sew down through the next bead in the previous round (figure 7, a-b). Sew up through the next bead, and repeat around the ring to complete the round (b-c).
(3) You will need to step up to start the next round. Sew up through two beads—the next bead in the previous round and the first bead added in the new round (c-d).
Alternatively, begin by picking up four beads, and sew through them again to form a ring. Sew through the first bead again, and snug up the beads (figure 8, a-b). Pick up two beads, and sew through the next bead (b-c). Repeat three times, and step up through the first bead added in this round.
Whether you begin with a ladder or a ring, continue adding two beads per stitch. As you work, snug up the beads to form a tube, and step up at the end of each round until your rope in the desired length.

Twisted tubular herringbone
(1) Form a base ring with an even number of beads. Pick up two beads, and sew through the next bead in the previous round (figure 9, a-b). Sew up through the next bead, and repeat around the ring to complete the round (b-c)
(2) You will need to step up to start the next round. Sew up through two beads—the bead from the previous round and the first bead added in the new round (c-d). Work one round of straight herringbone (d-e).
(3) To create a twist in the tube, pick up two beads, sew down through one bead in the next stack, then up through two beads in the following stack (e-f). Repeat around the ring, adding two beads per stitch. Step up to the next round through three beads (f-g). Snug up the beads to form a tube. The twist will begin to appear after the sixth round. Continue until your rope is the desired length.”

Twisted tubular herringbone
(1) Form a base ring with an even number of beads. Pick up two beads, and sew through the next bead in the previous round (figure 9, a-b). Sew up through the next bead, and repeat around the ring to complete the round (b-c)
(2) You will need to step up to start the next round. Sew up through two beads—the bead from the previous round and the first bead added in the new round (c-d). Work one round of straight herringbone (d-e).
(3) To create a twist in the tube, pick up two beads, sew down through one bead in the next stack, then up through two beads in the following stack (e-f). Repeat around the ring, adding two beads per stitch. Step up to the next round through three beads (f-g). Snug up the beads to form a tube. The twist will begin to appear after the sixth round. Continue until your rope is the desired length.”
Even if the written instructions confuse you, the diagrams are easy to follow. It will take some practice to get the tensions even and I bead the tube around a strand of 6° or 8° seed beads to keep the tube from collapsing. It also gives you a base to string additional large beads on. Check out Bead and Button magazine's website for more instructions and projects, http://www.beadandbutton.com/bnb/default.aspx.
Happy Beading!
Claudia
My Design Coordinator

Precious the Cat
Rojagato Designs got its name from my 11 yr. old cat that sits perched on a large dog pillow overseeing every jewelry piece from design to creation. In Spanish, “rojo” means red and “gato” means cat (the spelling and word placement was modified a little to create the business name.) Precious is a red and white short-haired tabby cat that has no idea that she is a cat. Precious was raised by our basset hound (who has since passed on) and gets along with dogs much better than cats. She was named for the ring in the book, The Hobbit.
Three years ago, Precious spent most of her days wandering from room to room in our house looking for new places to hide and sleep, and she now oversees everything in my work area since I took up making jewelry. Now she lives for jewelry beading. Every piece is carefully scrutinized by Precious as it is constructed and has to meet her final seal of approval before it goes up for sale.
For my customers with animal allergies, I want you to know that every jewelry piece is thoroughly cleaned prior to shipment. -- Claudia
Rojagato Designs got its name from my 11 yr. old cat that sits perched on a large dog pillow overseeing every jewelry piece from design to creation. In Spanish, “rojo” means red and “gato” means cat (the spelling and word placement was modified a little to create the business name.) Precious is a red and white short-haired tabby cat that has no idea that she is a cat. Precious was raised by our basset hound (who has since passed on) and gets along with dogs much better than cats. She was named for the ring in the book, The Hobbit.
Three years ago, Precious spent most of her days wandering from room to room in our house looking for new places to hide and sleep, and she now oversees everything in my work area since I took up making jewelry. Now she lives for jewelry beading. Every piece is carefully scrutinized by Precious as it is constructed and has to meet her final seal of approval before it goes up for sale.
For my customers with animal allergies, I want you to know that every jewelry piece is thoroughly cleaned prior to shipment. -- Claudia
Subscribe to:
Posts (Atom)