
 I've been kind of lax in my promise to post beading techniques and tips. School and my new part-time job are taking up a lot of my time, so I stayed up late tonight to write this blog post.
This stitch is a favorite of mine since you can use it as a base to build all sorts of jewelry on...plus it is a very easy technique to master. You can vary bead sizes, using a larger bead for the center of the daisy, or you can use all the same color and size to start a base for a necklace or choker.
Step One: 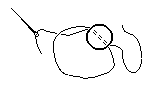
Pick up a "petal" bead on the needle. Pull the bead down the thread, leaving six to eight inches of thread as a tail. Pass the needle up through the bottom of the bead. (Try not to split the thread as it will be removed later. )

Pick up a "petal" bead on the needle. Pull the bead down the thread, leaving six to eight inches of thread as a tail. Pass the needle up through the bottom of the bead. (Try not to split the thread as it will be removed later. )

Step Two:
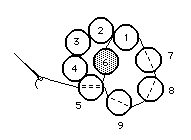
Pick up four more "petal" beads, then one "center" bead on the needle. Pass the needle back through bead #1 towards the tail.

Step Three:
Pick up three more "petal" beads (#7, #8 and #9) then pass the needle through bead #5.
Pick up three more "petal" beads (#7, #8 and #9) then pass the needle through bead #5.

Step Four:
Pick up one "petal" bead (#10) then pass the needle back through bead #9.

Step Five:
Pick up another "petal" bead (#11) then pass the needle back through bead #10.
Pick up another "petal" bead (#11) then pass the needle back through bead #10.

Step Six:
Pick up three more "petal" beads (#12, #13 and #14) and one "center" bead (#15). Pass the needle back through bead #11.

Step Seven:
Pick up three more "petal" beads (#16, #17 and #18) then pass the needle through bead #14.
Last Step:
Add more flowers until your chain reaches the desired length by repeating steps four through seven. Each additional daisy consists of 8 "petal" beads and 1 "center" bead.
When done, work the thread tail emerging from bead #1 back into the piece using the zig-zag method.
Here's a wonderful picture of a finished choker necklace using the daisy chain stitch with an interesting variation of colors.

Try this stitch out. It's fun and hard to make mistakes on. One piece of advice, use different colors for the "center" and "petal" beads to keep track of your stitches before you try a variation like this necklace.
Enjoy!
Claudia


